Generating SSL Certs with Let’s Encrypt

Here is what I did to generate Domain Verified wildcard SSL certificates from Ubuntu 18.04 LTS – no ports needs to be opened.  My domain is registered with Google Domains.  The follow is the command used to generate a wildcard cert for *.mydomain.com:

sudo apt-get install letsencrypt
sudo certbot certonly --manual --preferred-challenges=dns --email me@mydomain.com --agree-tos -d *.mydomain.com --server https://acme-v02.api.letsencrypt.org/directory

certbot will generate a value to be added to a DNS TXT record and says “Press Enter to Continue”.  At this point, I go to my Google Domains web console and added a TXT entry with the name _acme-challenge (or whatever name certbot gives you). I suggest adding a short TTL (e.g. 300 or 5m) so that you don’t have to wait a long time for a new value if somehow you screw this process up and have to change the value.

Screenshot from 2019-04-01 11-34-18

After adding the entry, wait a few minutes and press enter to continue with certbot.  It validated the new TXT entry and gave me the new certs.  At this point, the TXT entry should be deleted from the DNS.

This procedure was last used in March 2019 April 2020 June 2020 Sept 2020 Aug 2022.

Running Ceph-deploy on Google Cloud Compute (Part 2)

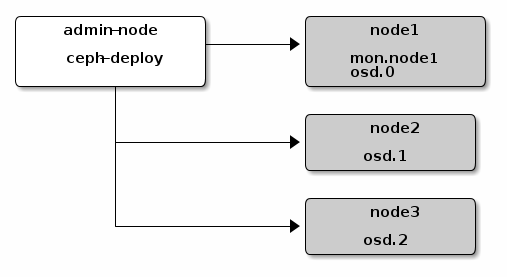
In Part 1, the infrastructure required for the initial Ceph deployment was set up on GCE.  We now move on to setting up Ceph with 1 Monitor and 3 OSDs according to the quick start guide here.

SSH into the admin node as ceph-admin and create a directory from which to execute ceph-deploy.

> mkdir my-cluster
> cd my-cluster

Create a new cluster by specifying the name of the node which will run the first monitor:

> ceph-deploy new node1

Recall from Part 1 that the first nodes was named node1.  A number of files will be created as a result of this command:

> ls
ceph.conf ceph-deploy-ceph.log ceph.mon.keyring

Next, install Ceph packages in the nodes:

> ceph-deploy install node1 node2 node3

Deploy the initial Monitor and gather they keys:

> ceph-deploy mon create-initial

At this point, the directory will have the following keys.  Note that this is less than keys indicated in the quick start guide; the mgr and rbd keyrings are not present.

> ll
total 156
drwxrwxr-x 2 ceph-admin ceph-admin   4096 Aug 17 22:18 ./
drwxr-xr-x 5 ceph-admin ceph-admin   4096 Aug 17 22:18 ../
-rw------- 1 ceph-admin ceph-admin    113 Aug 17 22:18 ceph.bootstrap-mds.keyring
-rw------- 1 ceph-admin ceph-admin    113 Aug 17 22:18 ceph.bootstrap-osd.keyring
-rw------- 1 ceph-admin ceph-admin    113 Aug 17 22:18 ceph.bootstrap-rgw.keyring
-rw------- 1 ceph-admin ceph-admin    129 Aug 17 22:18 ceph.client.admin.keyring
-rw-rw-r-- 1 ceph-admin ceph-admin    198 Aug 17 22:12 ceph.conf
-rw-rw-r-- 1 ceph-admin ceph-admin 125659 Aug 17 22:18 ceph-deploy-ceph.log
-rw------- 1 ceph-admin ceph-admin     73 Aug 17 22:12 ceph.mon.keyring

Copy the config and keys to your ceph nodes:

> ceph-deploy admin node1 node2 node3

Then finally add the OSDs and specify the disk to use for storage:

> ceph-deploy osd create node1:sdb node2:sdb node3:sdb

Troubleshooting

After adding 3 (minimum required is 3) OSDs, their health should show HEALTH_OK when ceph health is executed in the nodes.  For example:

> ssh node1 sudo ceph health
HEALTH_OK

However, in my case, I ran into a problem:

> ssh node1 sudo ceph health
HEALTH_ERR 64 pgs are stuck inactive for more than 300 seconds; 64 pgs stuck inactive; 64 pgs stuck unclean

Looking at the cluster status, I noticed 2 of the OSDs were down:

> ssh node1 sudo ceph osd tree
ID WEIGHT  TYPE NAME           UP/DOWN REWEIGHT PRIMARY-AFFINITY 
-1 0.01469 root default                                          
-2 0.00490     host node1                                   
 0 0.00490         osd.0          down        0          1.00000 
-3 0.00490     host node2                                   
 1 0.00490         osd.1            up  1.00000          1.00000 
-4 0.00490     host node3                                   
 2 0.00490         osd.2          down        0          1.00000

I have checked that sdb was automatically set up with xfs, so that’s not an issue.

> mount | grep sdb
/dev/sdb1 on /var/lib/ceph/osd/ceph-2 type xfs (rw,noatime,attr2,inode64,noquota)

I came across this thread, which mentions maybe there are some problems with the OSD processes.  So following this page, I ran the following to check on the ceph processes in the down nodes (i.e. node1 and node3).

> sudo systemctl status ceph\*.service ceph\*.target
● ceph-mon.target - ceph target allowing to start/stop all ceph-mon@.service instances at 
   Loaded: loaded (/lib/systemd/system/ceph-mon.target; enabled; vendor preset: enabled)
   Active: active since Thu 2017-08-17 22:18:13 UTC; 1h 25min ago

Aug 17 22:18:13 ceph-node3 systemd[1]: Reached target ceph target allowing to start/stop a

● ceph-radosgw.target - ceph target allowing to start/stop all ceph-radosgw@.service insta
   Loaded: loaded (/lib/systemd/system/ceph-radosgw.target; enabled; vendor preset: enable
   Active: active since Thu 2017-08-17 22:18:14 UTC; 1h 25min ago

Aug 17 22:18:14 ceph-node3 systemd[1]: Reached target ceph target allowing to start/stop a

● ceph-mds.target - ceph target allowing to start/stop all ceph-mds@.service instances at 
   Loaded: loaded (/lib/systemd/system/ceph-mds.target; enabled; vendor preset: enabled)
   Active: active since Thu 2017-08-17 22:18:12 UTC; 1h 25min ago

Aug 17 22:18:12 ceph-node3 systemd[1]: Reached target ceph target allowing to start/stop a

● ceph.target - ceph target allowing to start/stop all ceph*@.service instances at once
   Loaded: loaded (/lib/systemd/system/ceph.target; enabled; vendor preset: enabled)
   Active: active since Thu 2017-08-17 22:18:11 UTC; 1h 25min ago

Aug 17 22:18:11 ceph-node3 systemd[1]: Reached target ceph target allowing to start/stop a

● ceph-osd.target - ceph target allowing to start/stop all ceph-osd@.service instances at 
   Loaded: loaded (/lib/systemd/system/ceph-osd.target; enabled; vendor preset: enabled)
   Active: active since Thu 2017-08-17 22:18:13 UTC; 1h 25min ago

Aug 17 22:18:13 ceph-node3 systemd[1]: Reached target ceph target allowing to start/stop a
root@ceph-node3:/var/lib/ceph/osd/ceph-2# systemctl status ceph-osd.target
● ceph-osd.target - ceph target allowing to start/stop all ceph-osd@.service instances at 
   Loaded: loaded (/lib/systemd/system/ceph-osd.target; enabled; vendor preset: enabled)
   Active: active since Thu 2017-08-17 22:18:13 UTC; 1h 25min ago

Aug 17 22:18:13 ceph-node3 systemd[1]: Reached target ceph target allowing to start/stop a

(sorry some output has been cut off)

Notice that there is no ceph-osd@{id}.service.  So I tried restarting ceph-osd.target to see if the osd service can be restarted.

> systemctl restart ceph-osd.target

Inspecting the services again, now ceph-osd@2.service is visible but has an error:

> sudo systemctl status ceph\*.service ceph\*.target
...
● ceph-osd@2.service - Ceph object storage daemon
   Loaded: loaded (/lib/systemd/system/ceph-osd@.service; enabled; vendor preset: enabled)
   Active: inactive (dead) (Result: exit-code) since Thu 2017-08-17 23:47:50 UTC; 25s ago
  Process: 9187 ExecStart=/usr/bin/ceph-osd -f --cluster ${CLUSTER} --id %i --setuser ceph --setgroup ceph (code=exited, status=1/FAILURE)
  Process: 9140 ExecStartPre=/usr/lib/ceph/ceph-osd-prestart.sh --cluster ${CLUSTER} --id %i (code=exited, status=0/SUCCESS)
 Main PID: 9187 (code=exited, status=1/FAILURE)

Aug 17 23:47:44 ceph-node3 systemd[1]: ceph-osd@2.service: Main process exited, code=exited, status=1/FAILURE
Aug 17 23:47:44 ceph-node3 systemd[1]: ceph-osd@2.service: Unit entered failed state.
Aug 17 23:47:44 ceph-node3 systemd[1]: ceph-osd@2.service: Failed with result 'exit-code'.
Aug 17 23:47:50 ceph-node3 systemd[1]: Stopped Ceph object storage daemon.
...

I found the logs under /var/log/ceph/ceph-osd.2.log, which showed a permission problem:

> cat /var/log/ceph/ceph-osd.2.log
...
2017-08-17 22:40:26.280895 7f0a2064e8c0 -1 filestore(/var/lib/ceph/osd/ceph-2) mount failed to open journal /var/lib/ceph/osd/ceph-2/journal: (13) Permission denied
2017-08-17 22:40:26.281648 7f0a2064e8c0 -1 osd.2 0 OSD:init: unable to mount object store
2017-08-17 22:40:26.281659 7f0a2064e8c0 -1  ** ERROR: osd init failed: (13) Permission denied
...

/var/lib/ceph/osd/ceph-2/journal is mapped to a disk, which is in turned mapped to sdb2.

lrwxrwxrwx 1 ceph ceph   58 Aug 17 22:37 journal -> /dev/disk/by-partuuid/f01452f6-b9ba-41c8-b5d6-f8e0ebf30e18
lrwxrwxrwx 1 root root  10 Aug 17 22:38 f01452f6-b9ba-41c8-b5d6-f8e0ebf30e18 -> /dev/sdb2

It turns out that, for some reason, /dev/sdb2 did not have the correct permission:

> ls -lah /dev/sd*
brw-rw---- 1 root disk 8,  0 Aug 17 21:03 /dev/sda
brw-rw---- 1 root disk 8,  1 Aug 17 21:03 /dev/sda1
brw-rw---- 1 root disk 8, 16 Aug 17 22:37 /dev/sdb
brw-rw---- 1 ceph ceph 8, 17 Aug 17 22:37 /dev/sdb1
brw-rw---- 1 root root 8, 18 Aug 17 22:38 /dev/sdb2

I simply changed the owner:group back to ceph, and the OSD process did not complain anymore.

> chown ceph:ceph /dev/sdb2
> systemctl status ceph-osd@2.service
● ceph-osd@2.service - Ceph object storage daemon
   Loaded: loaded (/lib/systemd/system/ceph-osd@.service; enabled; vendor preset: enabled)
   Active: active (running) since Thu 2017-08-17 23:54:53 UTC; 41s ago
  Process: 10527 ExecStartPre=/usr/lib/ceph/ceph-osd-prestart.sh --cluster ${CLUSTER} --id %i (code=exited, status=0/SUCCESS)
 Main PID: 10573 (ceph-osd)
   CGroup: /system.slice/system-ceph\x2dosd.slice/ceph-osd@2.service
           └─10573 /usr/bin/ceph-osd -f --cluster ceph --id 2 --setuser ceph --setgroup ceph

Aug 17 23:54:53 ceph-node3 systemd[1]: ceph-osd@2.service: Service hold-off time over, scheduling restart.
Aug 17 23:54:53 ceph-node3 systemd[1]: Stopped Ceph object storage daemon.
Aug 17 23:54:53 ceph-node3 systemd[1]: Starting Ceph object storage daemon...
Aug 17 23:54:53 ceph-node3 ceph-osd-prestart.sh[10527]: create-or-move updated item name 'osd.2' weight 0.0049 at location {host=ceph-no
Aug 17 23:54:53 ceph-node3 systemd[1]: Started Ceph object storage daemon.
Aug 17 23:54:53 ceph-node3 ceph-osd[10573]: starting osd.2 at :/0 osd_data /var/lib/ceph/osd/ceph-2 /var/lib/ceph/osd/ceph-2/journal
Aug 17 23:54:53 ceph-node3 ceph-osd[10573]: 2017-08-17 23:54:53.776704 7f565e5aa8c0 -1 osd.2 0 log_to_monitors {default=true}

Fix the permission of /dev/sdb2 of all the failing nodes, and now the health of all 3 nodes are good: (running from admin node)

> ssh node3 sudo ceph osd tree
ID WEIGHT  TYPE NAME           UP/DOWN REWEIGHT PRIMARY-AFFINITY 
-1 0.01469 root default                                          
-2 0.00490     host node1                                   
 0 0.00490         osd.0            up  1.00000          1.00000 
-3 0.00490     host node2                                   
 1 0.00490         osd.1            up  1.00000          1.00000 
-4 0.00490     host node3                                   
 2 0.00490         osd.2            up  1.00000          1.00000 
> ssh node2 sudo ceph health
HEALTH_OK

Running Ceph-deploy on Google Cloud Compute (Part 1)

I’m just starting to learn about Ceph, and one of the obvious things to do is to follow Ceph’s ceph-deploy installation instructions here.  The initial goal is to set up something like this: ceph-nodes

Since I don’t have a bunch of servers sitting around, and my computer doesn’t have enough resources to run 4 virtual machines (VMs), I decided to try this setup in Google Cloud Platform’s (GCP) Google Compute Engine (GCE).

Virtual Machines

Create a project in the GCP console for this project.  The instructions calls for 4 nodes initially: an admin-node and OSD nodes node1, node2, node3.  Create 4 VMs in the GCE dashboard.  To save on costs, use the smallest f1-micro machine type along with the standard 10 GB persistent disk.  Choose a Name and a Zone, select Ubuntu 16.04 LTS as the image and leave everything else default for the admin node:

gcp-create-vm.png

For the OSD nodes, Ceph is going to require a disk for object storage.  For these VMs, expand Management disks, network, SSH keys at the bottom, select Disks, and add a Standard persistent disk of 10 GB (smallest possible) in size. Note that this step can be done after the VMs have already come up.

gce-create-disk.png

This disk will show up in Ubuntu as /dev/sdb.

Users & SSH Key

After the VMs come up, log into each VM and create a “ceph-admin” user using the “adduser” tool as root:

> adduser ceph-admin
 Adding user `ceph-admin' ...
 Adding new group `ceph-admin' (1003) ...
 Adding new user `ceph-admin' (1002) with group `ceph-admin' ...
 Creating home directory `/home/ceph-admin' ...
 Copying files from `/etc/skel' ...
 Enter new UNIX password:
 Retype new UNIX password:
 Sorry, passwords do not match
 passwd: Authentication token manipulation error
 passwd: password unchanged
 Try again? [y/N] y
 Enter new UNIX password:
 Retype new UNIX password:
 passwd: password updated successfully
 Changing the user information for ceph-admin
 Enter the new value, or press ENTER for the default
 Full Name []:
 Room Number []:
 Work Phone []:
 Home Phone []:
 Other []:
 Is the information correct? [Y/n]

Then give this user passwordless sudo access:

echo "ceph-admin ALL = (root) NOPASSWD:ALL" > /etc/sudoers.d/ceph-admin
> chmod 440 /etc/sudoers.d/ceph-admin

The ceph-admin user on the admin node must be able to SSH into nodes[1-3] using publickey authentication (the default Ubuntu image’s sshd config has password authentication disabled anyway).  SSH keys can either be set up manually or with the help of GCP’s SSH key manager (Compute Engine -> Metadata -> SSH Keys), which will inject public keys into the ~/.ssh/authorized_keys file of the specified user.  If the latter method is used, be sure the copy the private key into ~/.ssh of the ceph-admin user in the admin node.

As verification, log into the admin node as the ceph-admin user, and make sure it is possible to SSH into each of the other nodes and execute sudo su, all without having to enter any passwords.

Networking

Not much to do here.  By default, the VMs have access to the internet, and the iptables of the Ubuntu 16.04 LTS image are empty.

Install Packages

The Ceph instructions says to install NTP and OpenSSH server, but these are already available in the Ubuntu image used.  The only thing left is to install ceph-deploy on the admin node.  The steps are repeated here:

> wget -q -O- 'https://download.ceph.com/keys/release.asc' | sudo apt-key add -
> echo deb https://download.ceph.com/debian/ $(lsb_release -sc) main | sudo tee /etc/apt/sources.list.d/ceph.list
> sudo apt update
> sudo apt install ceph-deploy

At this point, we’ve completed all the steps from the pre-flight.  Next step is to create the Ceph cluster.


Creating a bootable Ubuntu Server install USB

I want to create a bootable USB stick to install Ubuntu 14.04 LTS on Dell PowerEdge servers.  Tried following these instructions: http://www.ubuntu.com/download/desktop/create-a-usb-stick-on-windows.  The procedure worked fine – I could boot up ubuntu and start the installation process.  However, during the installation, I encountered an error related to not being able to mount the cd-rom, similar to this http://askubuntu.com/questions/593002/fail-to-install-ubuntu-server-14-04-64bit-lts-from-usb-drive.

Re-plugging the USB stick into different slots didn’t help.  At the end, this worked:

> dd if=ubuntu-14.04.2-server-amd64.iso of=/dev/rdisk<n> bs=16M

Figure out the USB device <n> form /dev/disk<n>:

> diskutil list
...
/dev/disk4 (external, physical):
   #:                       TYPE NAME                    SIZE       IDENTIFIER
   0:     FDisk_partition_scheme                        *8.0 GB     disk4
   1:                 DOS_FAT_32 ESD-USB                 8.0 GB     disk4s1

Find out where it is mounted

> mount
/dev/disk1 on / (hfs, NFS exported, local, journaled)
devfs on /dev (devfs, local, nobrowse)
map -hosts on /net (autofs, nosuid, automounted, nobrowse)
map auto_home on /home (autofs, automounted, nobrowse)
localhost:/tyjZDljROfoXtjwL_kaBo6 on /Volumes/MobileBackups (mtmfs, nosuid, read-only, nobrowse)
//syin@nas/tm-syin on /Volumes/tm-syin (afpfs, nobrowse)
/dev/disk3s2 on /Volumes/Time Machine Backups (hfs, local, nodev, nosuid, journaled, nobrowse)
/dev/disk4s1 on /Volumes/ESD-USB (msdos, local, nodev, nosuid, noowners)

Unmount it (not Ejecting it using the GUI)

> diskutil unmount /Volumes/ESD-USB
Volume ESD-USB on disk4s1 unmounted

Use dd to copy the image:

> sudo dd if=ubuntu-14.04.4-server-amd64.iso of=/dev/rdisk4
36+1 records in
36+1 records out
607125504 bytes transferred in 53.760857 secs (11293077 bytes/sec)

SSH to a server using password only

There are times when I want to SSH to a server, which is already set up in /etc/hosts to use pub key authentication (i.e. IdentifyFile is set), with a password.  This could be because the remote server has been re-formatted with a fresh OS, or I am testing some SSH configuration changes.  To bypass pub key authentication:

ssh <user>@<ip> -o PubkeyAuthentication=no

This has worked for me in Ubuntu 14.04 servers.

Reference: Stack Exchange

Misc Networking Debug Checklist

Slow connection

  • test with iperf
  • test with speedtest-cli (pip install speedtest-cli)
  • check whether upstream supports auto-negotiation (they often don’t)

Ping Fail

  • Check routing table for both to and return path
  • check NIC is up
  • if packet will come in one interface and go out another, check

    /proc/sys/net/ipv4/conf/all/rp_filter = 2

  • check /proc/sys/net/ipv4/ip_forward = 1 for the router
  • check if packet is filtered by iptables
  • IP address on an interface connected to a bridge will not work; move the IP address to the bridge.

stable/kilo devstack “Service [x] is not running” failure

When stacking the stable/kilo version of devstack on an Ubuntu 14.04.2 host, I often come across the following errors:

2016-03-29 23:44:14.771 | ++ awk -v matchgroup=post-extra '
2016-03-29 23:44:14.771 | /^\[\[.+\|.*\]\]/ {
2016-03-29 23:44:14.771 | gsub("[][]", "", $1);
2016-03-29 23:44:14.771 | split($1, a, "|");
2016-03-29 23:44:14.771 | if (a[1] == matchgroup)
2016-03-29 23:44:14.771 | print a[2]
2016-03-29 23:44:14.771 | }
2016-03-29 23:44:14.771 | ' /home/ubuntu/devstack/local.conf
2016-03-29 23:44:14.773 | + [[ -x /home/ubuntu/devstack/local.sh ]]
2016-03-29 23:44:14.773 | + service_check
2016-03-29 23:44:14.773 | + local service
2016-03-29 23:44:14.773 | + local failures
2016-03-29 23:44:14.773 | + SCREEN_NAME=stack
2016-03-29 23:44:14.773 | + SERVICE_DIR=/opt/stack/status
2016-03-29 23:44:14.773 | + [[ ! -d /opt/stack/status/stack ]]
2016-03-29 23:44:14.773 | ++ ls /opt/stack/status/stack/h-api.failure
2016-03-29 23:44:14.774 | + failures=/opt/stack/status/stack/h-api.failure
2016-03-29 23:44:14.774 | + for service in '$failures'
2016-03-29 23:44:14.775 | ++ basename /opt/stack/status/stack/h-api.failure
2016-03-29 23:44:14.775 | + service=h-api.failure
2016-03-29 23:44:14.775 | + service=h-api
2016-03-29 23:44:14.775 | + echo 'Error: Service h-api is not running'
2016-03-29 23:44:14.775 | Error: Service h-api is not running
2016-03-29 23:44:14.775 | + '[' -n /opt/stack/status/stack/h-api.failure ']'
2016-03-29 23:44:14.775 | + die 1384 'More details about the above errors can be found with screen, with ./rejoin-stack.sh'
2016-03-29 23:44:14.775 | + local exitcode=0
2016-03-29 23:44:14.775 | [Call Trace]
2016-03-29 23:44:14.776 | ./stack.sh:1341:service_check
2016-03-29 23:44:14.776 | /home/ubuntu/devstack/functions-common:1384:die
2016-03-29 23:44:14.777 | [ERROR] /home/ubuntu/devstack/functions-common:1384 More details about the above errors can be found with screen, with ./rejoin-stack.sh
2016-03-29 23:44:15.779 | Error on exit

I have only seen this problem with Glance and Heat.  This is often due to the service fail to start in 30 seconds for some reason, which I haven’t spend the time to investigate yet.  In my experience, the easiest way to get around it is to increase the time out in the code, unstack and restack.  For example, in heat, edit /opt/stack/heat/heat/common/wsgi.py:

diff --git a/heat/common/wsgi.py b/heat/common/wsgi.py
index 9646c8c..2a45b81 100644
--- a/heat/common/wsgi.py
+++ b/heat/common/wsgi.py
@@ -224,7 +224,7 @@ def get_socket(conf, default_port):
                              "option value in your configuration file"))
 
     sock = None
-    retry_until = time.time() + 30
+    retry_until = time.time() + 300
     while not sock and time.time() < retry_until:
         try:
             sock = eventlet.listen(bind_addr, backlog=conf.backlog,

For Glance the same can be found in /opt/stack/glance/glance/common/wsgi.py

Convert snapshots to images

To convert a snapshot to an image in a stable/kilo devstack deployment:

> cd devstack

> source openrc admin admin

> glance image-download snapshot-name --file file-name.qcow2

> qemu-img info file-name.qcow2 
image: file-name.qcow2
file format: qcow2
virtual size: 20G (21474836480 bytes)
disk size: 1.2G
cluster_size: 65536
Format specific information:
    compat: 1.1
    lazy refcounts: false

> glance image-create --name "image-name" --disk-format qcow2 --container-format bare --min-disk=20 --is-public True --is-protected True --file file-name.qcow2 --progress
[=============================>] 100%
+------------------+--------------------------------------+
| Property         | Value                                |
+------------------+--------------------------------------+
| checksum         | 9c41a91e52e9861d936b7745aff8e398     |
| container_format | bare                                 |
| created_at       | 2016-02-11T00:40:53.000000           |
| deleted          | False                                |
| deleted_at       | None                                 |
| disk_format      | qcow2                                |
| id               | b7f8813a-5de2-401f-ada9-f991b0da1477 |
| is_public        | True                                 |
| min_disk         | 20                                   |
| min_ram          | 0                                    |
| name             | image-name                           |
| owner            | cf35638e823547358af7e8cb454468d4     |
| protected        | True                                 |
| size             | 1298661376                           |
| status           | active                               |
| updated_at       | 2016-02-11T00:41:01.000000           |
| virtual_size     | None                                 |
+------------------+--------------------------------------+

TODO: There should be a way to change the virtual size to be < 20 GiB?

Add glance images to OpenStack (devstack)

This is tested on an devstack (kilo/stable) openstack deployment.

Download image from Ubuntu:

> wget https://cloud-images.ubuntu.com/trusty/current/trusty-server-cloudimg-amd64-disk1.img

Check image:

> qemu-img info trusty-server-cloudimg-amd64-disk1.img 
image: trusty-server-cloudimg-amd64-disk1.img
file format: qcow2
virtual size: 2.2G (2361393152 bytes)
disk size: 247M
cluster_size: 65536
Format specific information:
    compat: 0.10

Add image:

> glance image-create --name "ubuntu-trusty" --disk-format qcow2 --container-format bare --min-disk=3 --is-public True --is-protected True --file trusty-server-cloudimg-amd64-disk1.img --progress 
[=============================>] 100%
+------------------+--------------------------------------+
| Property         | Value                                |
+------------------+--------------------------------------+
| checksum         | 7cbbef9e79697ee68b041cf4304d1177     |
| container_format | bare                                 |
| created_at       | 2016-02-09T23:22:34.000000           |
| deleted          | False                                |
| deleted_at       | None                                 |
| disk_format      | qcow2                                |
| id               | 9f91bebc-30e7-4a85-a247-bae2d587e8ec |
| is_public        | True                                 |
| min_disk         | 3                                    |
| min_ram          | 0                                    |
| name             | ubuntu-trusty                        |
| owner            | cf35638e823547358af7e8cb454468d4     |
| protected        | True                                |
| size             | 247MB                                |
| status           | active                               |
| updated_at       | 2016-02-09T23:22:37.000000           |
| virtual_size     | None                                 |
+------------------+--------------------------------------+